Rancilio Epoca One Group Thermistor Retro-Fit Kit - Post-2007
This is a special order item and will ship separately. Please allow 6 - 10 business days (typically) for the item to be processed prior to shipping.
This kit replaces part #34-200-114 from the Rancilio Epoca E-1 versions post-2007 models. For the older, pre-2007 Epoca models, do not order this kit.
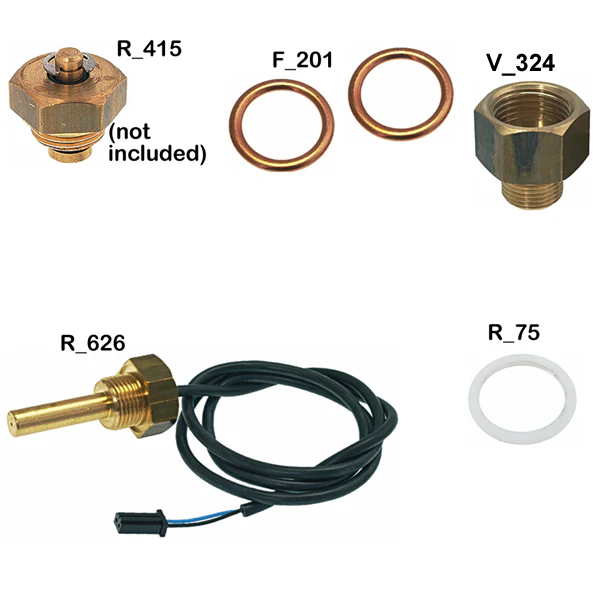
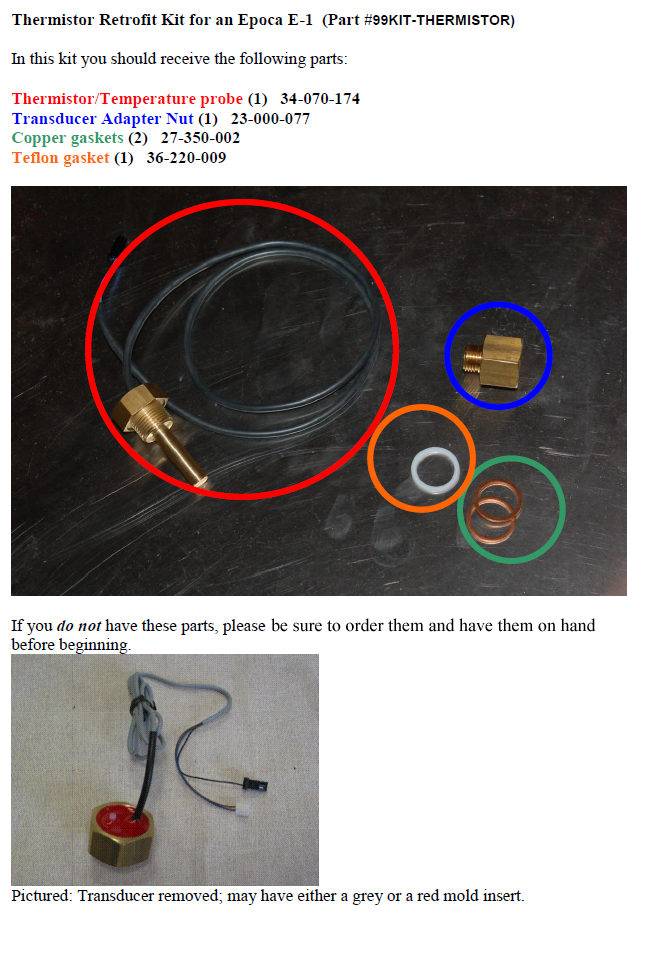
Part #: 99KIT-THERMISTOR.
Thermistor Retro-Fit Kit Includes;
- (F_201) 3/8 Copper Gasket.
- (R_626) Rancilio Classe/Epoca Temperature Sensor Probe.
- (V_324) 3/8 F x 1/4 M Fitting.
- (GUAR21682) PTFE Gasket for 3/8 Fittings.
How to Replace;
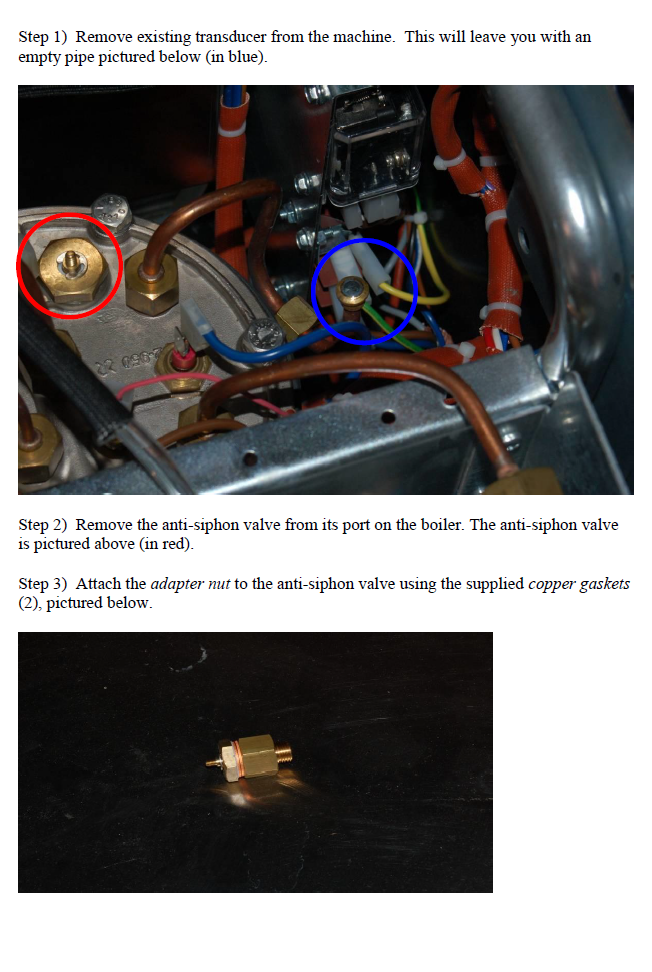
Step 1.) Remove the existing transducer from the machine (not the pipe, just the transducer). This will leave you with an open pipe end.
Step 2.) Remove the anti-siphon valve (Part R_415 - not included - the brass part on the right side of the boiler as you face the front with the little pin sticking out and a c-clip on top of it) from the boiler.
Step 3.) Now thread the adapter nut (part R_1282) and anti-siphon valve together using the two copper gaskets (part F_201). The two copper gaskets are used in between the anti-siphon valve and the adapter fitting (no gasket is required in between the assembled parts and the boiler).
Step 4.) Thread the anti-siphon/adapter assembly onto the open pipe end where the transducer was.
Step 5.) Lastly, thread the new supplied temperature probe (part R_626) into the opening in the boiler where the anti-siphon valve was, using the supplied PTFE gasket (part R_75).

Product Information
Product Information
Shipping & Returns
Shipping & Returns
Description
This is a special order item and will ship separately. Please allow 6 - 10 business days (typically) for the item to be processed prior to shipping.
This kit replaces part #34-200-114 from the Rancilio Epoca E-1 versions post-2007 models. For the older, pre-2007 Epoca models, do not order this kit.
Part #: 99KIT-THERMISTOR.
Thermistor Retro-Fit Kit Includes;
- (F_201) 3/8 Copper Gasket.
- (R_626) Rancilio Classe/Epoca Temperature Sensor Probe.
- (V_324) 3/8 F x 1/4 M Fitting.
- (GUAR21682) PTFE Gasket for 3/8 Fittings.
How to Replace;
Step 1.) Remove the existing transducer from the machine (not the pipe, just the transducer). This will leave you with an open pipe end.
Step 2.) Remove the anti-siphon valve (Part R_415 - not included - the brass part on the right side of the boiler as you face the front with the little pin sticking out and a c-clip on top of it) from the boiler.
Step 3.) Now thread the adapter nut (part R_1282) and anti-siphon valve together using the two copper gaskets (part F_201). The two copper gaskets are used in between the anti-siphon valve and the adapter fitting (no gasket is required in between the assembled parts and the boiler).
Step 4.) Thread the anti-siphon/adapter assembly onto the open pipe end where the transducer was.
Step 5.) Lastly, thread the new supplied temperature probe (part R_626) into the opening in the boiler where the anti-siphon valve was, using the supplied PTFE gasket (part R_75).